Show Custom Billing Checkout Fields by Product ID
In this post we will show you how you can customize the Woocommerce Checkout Fields with actions and filters.
How Woocommerce Builds the Checkout Fields
For the checkout, the invoice and shipping fields are taken from the country class (class-wc-countries.php) and the get_address_fields function. Thus, fields can be activated and deactivated by Woocommerce depending on the user’s location.
Billing:
$address_fields = apply_filters('woocommerce_billing_fields', $address_fields);
Shipping:
$address_fields = apply_filters('woocommerce_shipping_fields', $address_fields);
The loaded fields are inserted into the “checkout_fields” array by the checkout class and some more fields like “order notes” are added.
$this->checkout_fields['billing'] = $woocommerce->countries->get_address_fields( $this->get_value('billing_country'), 'billing_' );
$this->checkout_fields['shipping'] = $woocommerce->countries->get_address_fields( $this->get_value('shipping_country'), 'shipping_' );
$this->checkout_fields['account'] = array(
'account_username' => array(
'type' => 'text',
'label' => __('Account username', 'woocommerce'),
'placeholder' => _x('Username', 'placeholder', 'woocommerce')
),
'account_password' => array(
'type' => 'password',
'label' => __('Account password', 'woocommerce'),
'placeholder' => _x('Password', 'placeholder', 'woocommerce'),
'class' => array('form-row-first')
),
'account_password-2' => array(
'type' => 'password',
'label' => __('Account password', 'woocommerce'),
'placeholder' => _x('Password', 'placeholder', 'woocommerce'),
'class' => array('form-row-last'),
'label_class' => array('hidden')
)
);
$this->checkout_fields['order'] = array(
'order_comments' => array(
'type' => 'textarea',
'class' => array('notes'),
'label' => __('Order Notes', 'woocommerce'),
'placeholder' => _x('Notes about your order, e.g. special notes for delivery.', 'placeholder', 'woocommerce')
)
);
The array is also passed through a filter:
$this->checkout_fields = apply_filters('woocommerce_checkout_fields', $this->checkout_fields);
So you have full control over the checkout fields. You just need to know how to access them, then you can customise the fields.
Overriding the Core Fields
With the help of the “woocommerce_checkout_fields” filter, you can overwrite any field. This is a list of all fields in the array that are passed to “woocommerce_checkout_fields”:
Billing
- billing_first_name
- billing_last_name
- billing_company
- billing_address_1
- billing_address_2
- billing_city
- billing_postcode
- billing_country
- billing_state
- billing_email
- billing_phone
Shipping
- shipping_first_name
- shipping_last_name
- shipping_company
- shipping_address_1
- shipping_address_2
- shipping_city
- shipping_postcode
- shipping_country
- shipping_state
Account
- account_username
- account_password
- account_password-2
Order
- order_comments
Each field contains an array of properties:
- type – type of field (text, textarea, password, select)
- label – label for the input field
- placeholder – placeholder for the input
- class – class for the input
- required – true or false, whether or not the field is require
- clear – true or false, applies a clear fix to the field/label
- label_class – class for the label element
- options – for select boxes, array of options (key => value pairs)
In specific cases you need to use the woocommerce_default_address_fields filter. This filter is applied to all billing and shipping default fields:
- country
- first_name
- last_name
- company
- address_1
- address_2
- city
- state
- postcode
Here are some examples:
Change the order_comments fields’ placeholder
add_filter( 'woocommerce_checkout_fields' , 'arrow_design_custom_override_checkout_fields' );function arrow_design_custom_override_checkout_fields( $fields ) {
$fields['order']['order_comments']['placeholder'] = 'My new placeholder';
return $fields;
}
Change Labels
add_filter( 'woocommerce_checkout_fields' , 'arrow_design_custom_override_checkout_fields' );

function arrow_design_custom_override_checkout_fields( $fields ) {
$fields['order']['order_comments']['placeholder'] = 'My new placeholder';
$fields['order']['order_comments']['label'] = 'My new label';
return $fields;
}
Remove Fields
add_filter( 'woocommerce_checkout_fields' , 'arrow_design_custom_override_checkout_fields' );function arrow_design_custom_override_checkout_fields( $fields ) {
unset($fields['order']['order_comments']);return $fields;
}
Make the address_1 Field Optional
add_filter( 'woocommerce_default_address_fields' , 'arrow_design_custom_override_default_address_fields' );function arrow_design_custom_override_default_address_fields( $address_fields ) {
$address_fields['address_1']['required'] = false;return $address_fields;
}
Add a Select Field
$fields['billing']['your_field']['options'] = array(
'option_1' => 'Option 1 text',
'option_2' => 'Option 2 text'
);
Priority
When overwriting existing code, it is useful to set a priority. This indicates when a part of the code, a so-called function, is executed in relation to the loading of a page. The higher the priority, the earlier the function is executed. For example, a function with priority 20 is executed before one with priority 10. The priority is set in the function “add_action”.
Below is an example on priority:
In this example we want to change the link of the “Return to Shop” button on the cart page to “https://arrowdesign.ie/category/specials/”.
function arrow_design_empty_cart_redirect_url() {
return 'https://arrowdesign.ie/category/specials/';
}
add_filter( 'woocommerce_return_to_shop_redirect', 'arrow_design_empty_cart_redirect_url', 10 );
We set the priority to 10, which is the typical default setting for WooCommerce functions and scripts. Because of this, it may not be high enough to override the functionality of this button. So we should set the priority to a higher number, 11 would already work, but it is recommended to use increments of ten, so 20, 30 and so on.
function arrow_design_empty_cart_redirect_url() {
return 'https://arrowdesign.ie/category/specials/';
}
add_filter( 'woocommerce_return_to_shop_redirect', 'arrow_design_empty_cart_redirect_url', 20 );
Add Custom Shipping And Billing Fields
Adding fields works similar to overwriting fields. The field is defined in the “checkout_fields” array and is thus automatically processed and stored in the order post meta. If you want to add validation rules, see the checkout class where there are additional hooks you can use.
In the following example, a new field is added to the shipping fields.
add_filter( 'woocommerce_checkout_fields' , 'arrow_design_custom_override_checkout_fields' );

function arrow_design_custom_override_checkout_fields( $fields ) {
$fields['shipping']['shipping_phone'] = array(
'label' => __('Phone', 'woocommerce'),
'placeholder' => _x('Phone', 'placeholder', 'woocommerce'),
'required' => false,
'class' => array('form-row-wide'),
'clear' => true
);

return $fields;
}

/**
* Display field value on the order edit page
*/

add_action( 'woocommerce_admin_order_data_after_shipping_address', 'arrow_design_custom_checkout_field_display_admin_order_meta', 10, 1 );

function arrow_design_custom_checkout_field_display_admin_order_meta($order){
echo '<p><strong>'.__('Phone From Checkout Form').':</strong> ' . get_post_meta( $order->get_id(), '_shipping_phone', true ) . '</p>';
}
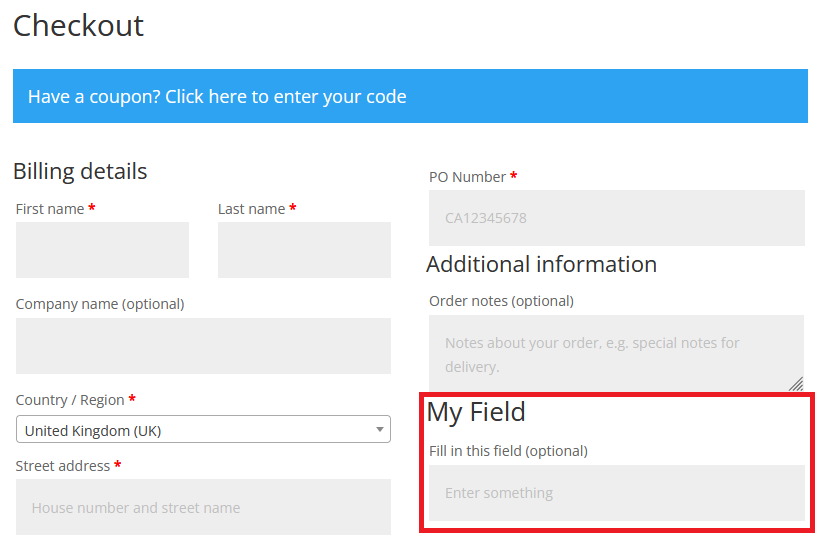
Add a Custom Special Field
Adding a custom field is also similar. In the example, we add a new field under the “Order Notes” in checkout.
add_action( 'woocommerce_after_order_notes', 'arrow_design_custom_checkout_field' );function arrow_design_custom_checkout_field( $checkout ) {
echo '<div id="my_custom_checkout_field"><h2>' . __('My Field') . '</h2>';
woocommerce_form_field( 'my_field_name', array(
'type' => 'text',
'class' => array('my-field-class form-row-wide'),
'label' => __('Fill in this field'),
'placeholder' => __('Enter something'),
), $checkout->get_value( 'my_field_name' ));echo '</div>';
}
This will result in this:
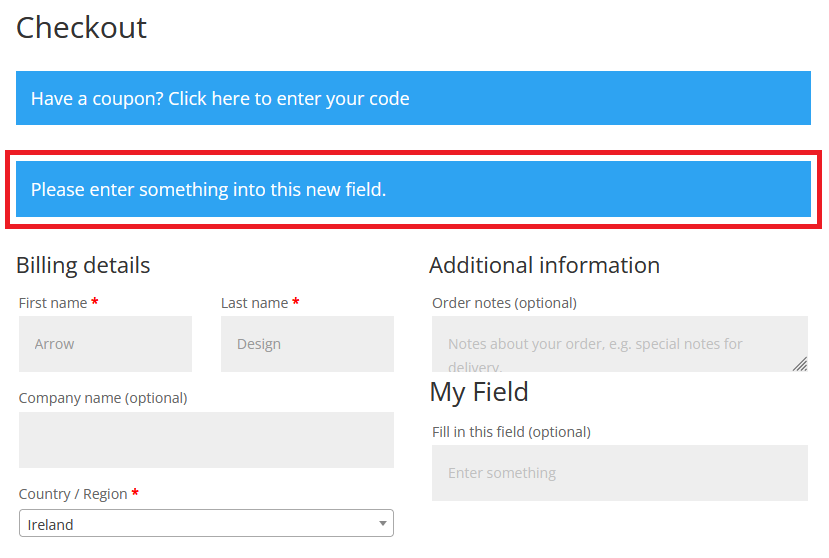
Then we need to validate the field when the checkout form is submitted. In the following example, the field is required.
add_action('woocommerce_checkout_process', 'arrow_design_custom_checkout_field_process');

function arrow_design_custom_checkout_field_process() {
// Check if set, if its not set add an error.
if ( ! $_POST['my_field_name'] )
wc_add_notice( __( 'Please enter something into this new field.' ), 'error' );
}
Now an error is displayed when the field is not filled out and you click on “Place order”:
Finally, we use the following code to save the field in the custom fields of the order:
add_action( 'woocommerce_checkout_update_order_meta', 'arrow_design_custom_checkout_field_update_order_meta' );

function arrow_design_custom_checkout_field_update_order_meta( $order_id ) {
if ( ! empty( $_POST['my_field_name'] ) ) {
update_post_meta( $order_id, 'My Field', sanitize_text_field( $_POST['my_field_name'] ) );
}
}
If you also want to display the custom field value on the admin order edition page, you can use this code:
add_action( 'woocommerce_admin_order_data_after_billing_address', 'arrow_design_custom_checkout_field_display_admin_order_meta', 10, 1 );

function arrow_design_custom_checkout_field_display_admin_order_meta($order){
echo '<p><strong>'.__('My Field').':</strong> ' . get_post_meta( $order->id, 'My Field', true ) . '</p>';
}
Make Phone Number Field Not Required
Here you can see how to make a required field (the phone number field in this example) not required:
add_filter( 'woocommerce_billing_fields', 'arrow_design_npr_filter_phone', 10, 1 );

function arrow_design_npr_filter_phone( $address_fields ) {
$address_fields['billing_phone']['required'] = false;
return $address_fields;
}
Add Custom Fields To Emails
You can also add the custom fields to the “Order Completed” emails.
/* To use:
1. Add this snippet to your theme's functions.php file
2. Change the meta key names in the snippet
3. Create a custom field in the order post – e.g. key = "Tracking Code" value = abcdefg
4. When next updating the status, or during any other event which emails the user, they will see this field in their email
*/

add_filter('woocommerce_email_order_meta_keys', 'arrow_design_custom_order_meta_keys');

function arrow_design_custom_order_meta_keys( $keys ) {
$keys[] = 'Tracking Code'; // This will look for a custom field called 'Tracking Code' and add it to emails
return $keys;
}
Conclusion
We hope this Show Custom Billing Checkout Fields by Product ID post was helpful and you are able to integrate this on your own website! You can find more articles here:
Read another Woocommerce post : ‘Minimum and Maximum Quantity for Woocommerce Products‘
For more excellent information on this topic, visit woocommerce.com/document
Arrow Design, based in Dublin, Ireland, provides quality website design services in Dublin and beyond at affordable prices. If you would like help with implementing the above code, or any wordpress website development project, contact us. We love website design and it shows! We provide custom wordpress plugin development, website design training and lots more.
We do it all, so you don’t have to!
Related Posts

Woocommerce Account Page Hook Guide
In this article you will find a visual hook guide for the Woocommerce Account Pages, like the Login/Register page, the Downloads page or the Orders page.

Woocommerce Single Product Page Hook Guide
In this article you will find a visual hook guide for the Woocommerce Single Product Page. This should help you to quickly and easily find the hook positions on the page.

Woocommerce PHP – Product Categories by Product ID
In this tutorial you will learn how to check if a product is assigned to a tag, a category or a custom taxonomy. You can check if a product is is on the shop page, in the cart, in an order & more.
…We do more, so you can do less 🙂