Make Billing and Shipping Fields Required
In this post we will show you how to make the fields on the Woocommerce Checkout Page required. You don’t need to set all fields to required, you can also choose only one or some fields.
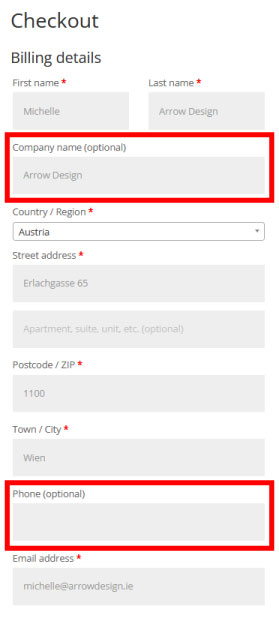
This is how the Checkout Page look like before changing the code (some fields are already required, some are not required):
You can set the required fields by adding the following code to your functions.php file:
add_filter( 'woocommerce_checkout_fields', 'arrow_design_woo_filter_checkout_fields' );

function arrow_design_woo_filter_checkout_fields( $fields ) {
// Billing fields
$fields['billing']['billing_company']['required'] = true;
$fields['billing']['billing_email']['required'] = true;
$fields['billing']['billing_phone']['required'] = true;
$fields['billing']['billing_state']['required'] = true;
$fields['billing']['billing_first_name']['required'] = true;
$fields['billing']['billing_last_name']['required'] = true;
$fields['billing']['billing_address_1']['required'] = true;
$fields['billing']['billing_address_2']['required'] = true;
$fields['billing']['billing_city']['required'] = true;
$fields['billing']['billing_postcode']['required'] = true;

// Shipping fields
$fields['shipping']['shipping_company']['required'] = true;
$fields['shipping']['shipping_phone']['required'] = true;
$fields['shipping']['shipping_state']['required'] = true;
$fields['shipping']['shipping_first_name']['required'] = true;

$fields['shipping']['shipping_last_name'] = true;
$fields['shipping']['shipping_address_1'] = true;
$fields['shipping']['shipping_address_2'] = true;
$fields['shipping']['shipping_city'] = true;
$fields['shipping']['shipping_postcode'] = true;

return $fields;
}
This is how the Checkout Page look like after changing the code

Conclusion
We hope this Make Billing and Shipping Fields Required post was helpful and you are now able to integrate this also on your website! You can find more articles here:
Read another Woocommerce post : ‘Add Email Recipient when Order Completed‘
Arrow Design, based in Dublin, Ireland, provides quality website design services in Dublin and beyond at affordable prices. If you would like help with implementing the above code, or any wordpress website development project, contact us. We love website design and it shows! We provide custom wordpress plugin development, website design training and lots more.
We do it all, so you don’t have to!
Related Posts

Woocommerce Account Page Hook Guide
In this article you will find a visual hook guide for the Woocommerce Account Pages, like the Login/Register page, the Downloads page or the Orders page.

Woocommerce Single Product Page Hook Guide
In this article you will find a visual hook guide for the Woocommerce Single Product Page. This should help you to quickly and easily find the hook positions on the page.

Woocommerce PHP – Product Categories by Product ID
In this tutorial you will learn how to check if a product is assigned to a tag, a category or a custom taxonomy. You can check if a product is is on the shop page, in the cart, in an order & more.
…We do more, so you can do less 🙂